Introductory Discourse, Disclosure, and Decisions
At this point of the project, I had some decisions to make. And, if I am completely honest, I’m not entirely sure I would make the same decisions again. The first big decision was building material. Years ago, I did a project with MDF (medium density fiberboard) and really didn’t want to work with it again. First of all, it’s really really heavy material. And, while it’s insanely easy to cut, I was concerned about finishing it. The face of MDF has a great, smooth surface, but the edges don’t have quite the same finish. In the past, I’ve used super glue to seal the edges, but this just didn’t seem like the best path. In short, I pretty quickly discounted MDF as my construction material.
Then I had the idea to build the facade with 2″ insulating foam. In some pictures, you can see where I took a single piece of the foam and put it against the wall to see how that would look. As if a 2″ deep facade would yield good results. No dice. But, this material did have a lot in its favor:
- it is relatively easy to cut and shape
- it is lightweight, so I can manage a lot of the work by myself
- it is really easy to test connect pieces with T-pins or finishing nails
When I think about the whole project, there are some places I would really have preferred to use MDF. However, there were a lot of benefits from the foam that I am not currently appreciating. There is definitely a “grass is always greener” lessons here.
 The Bounding Box

I might have save a lot of time and effort if I had designed this in CAD to begin with, but there was already a 3D model. Having never done this before, I wanted to jump right in and start building. Visualizing the space wasn’t too difficult: the challenge was mostly figuring out how to build this.
The facade took shape quickly. As you can see from the photo, a few quick cuts to the foam and we have ourselves a facade! It isn’t very interesting yet, but it does help with blocking out the space.
This foam is designed to be “scored and snapped.” This is completely sufficiently when it’s being tucked into a wall for insulation, but what if you need clean edges? A hot wire cutter is typically used for cutting and shaping foam, but I didn’t do that. For these cuts, I just set the blade on my table saw and carefully made the cuts. This is insulation material. If it pinches the blade (at all), it gets hot and melts. Very fortunately, the blade didn’t tend to grab the foam and kickback!
 Notice that the inside of the panel stretches all the way to the door. In order to make this work (and to keep the wall square), the inside panel was cut a little bit deeper (1 1/2″) than the outside panel. It’s also important to make sure the height is correct to. This will actually help keep the panel in place because it will wedge the side panels between the floor and the top of the door.
This picture shows the actual dimensions that I used. This is the drawing for the left hand panel – you will have to mirror these dimensions for the right hand panel.
 Mark It and Cut It

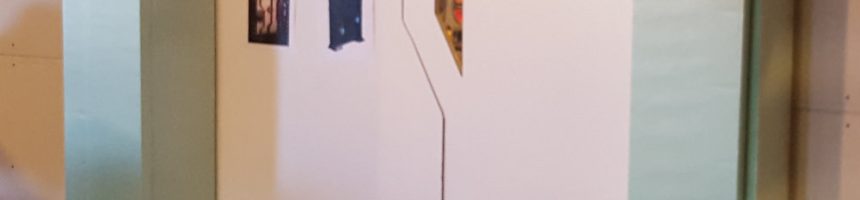
I spent a little time studying the different views of the Stertman rendering (you can see them taped to the door). Although I don’t remember doing it, I’m sure I spent some time with a ruler to estimate the placement of the different features. Most are pretty easy to estimate and eyeballing it goes a long way. In this picture, you can see where I drew the “buckles” on the front panel.
I know that I would want to set a physical piece in there, so I only routed down about 3/4″. I just used a long utility blade to cut out the rest. Several shallow passes with the blade was an effective strategy – this kept the foam from tearing out while cutting.
Perhaps the best part of working with this foam was how easy it was to shape with a router. Sure, it made a complete mess, but it generally left a pretty clean cut behind.
 Adding the Bevels

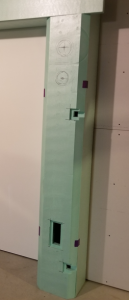
This project has increased my respect for the table saw. Well…who are we kidding? At this point, I downright fear the table saw. For these cuts, I set the blade on the table saw at 45° and then trimmed both sides of the front vertical panels. When I did this cut, I made sure that the waste material was “under” the blade. This helped ensure that I didn’t pinch the blade. If you look closely near the top right of the picture, you will see that I let the foam creep off the fence a little and there’s a nice mark where it “kissed” the side of the blade. It’s ugly now, but you won’t see it in the final product.
As you can see in the picture, I used some duct tape to tape the wall sections together. The tape wasn’t extremely secure and easily peeled off of the foam.
 In Formation Security?

Please forgive the pun (or don’t, it’s okay).
At this point, every time I bumped into the wall, a piece fell down. It was time to find a way to start securing things. Furthermore, I knew these connections were temporary (for now), so I needed a solution that would let me take things apart as needed.
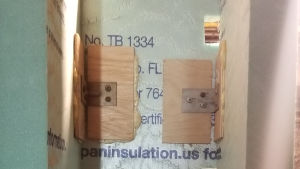
It turns out that Gorilla Glue is outstanding for bonding stuff to this foam. This glue expands as it cures, so you need to secure what you are gluing. I used a lot of handi-clamps in this project. As you can see from the picture, I glued down some thin, wood panels where I wanted to join the pieces. After applying the glue and plopping the wood on there, I clamped them until they were cured. The glue packaging recommended 24 hours, but I usually found it likely workable after a couple of hours.
Oh, and a quick note about that glue. It’s awesomely powerful stuff. First, don’t get it on your fingers. It’s gross, sticky, and messy. Second, if you aren’t going to finish this project in a month or two, you will need to get more than one bottle – even if you don’t use it all. Over time, the glue slowly thickens and gets very hard to apply.
 It’s Hip to be Square

Yeah, I don’t know what’s wrong with me today.
Unless you are remarkably talented (or just really artistic), I find it very hard to build things out-of-square. After joining the panels, I used a speed square to make sure they were sitting pretty square. In most cases, the panels were a little off. This isn’t really a big deal, but I like to keep things as square as possible for as long as possible. By the end of the process, it was bound to be a little off. As long as I took some care now, the final result would be a little better.
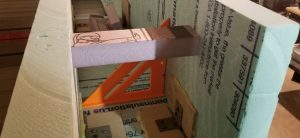
A couple places along the back, I glued in some scrap pieces of the foam. This provided a good “box rigidity” to the structure and also gave me a great place to grab to move the wall panels around. Oh, and clamping here didn’t work quite as well, so this is where I started pinning the foam in place using 3″ finishing nails. Once you glue the piece in place, slide a finishing nail in on an angle leaving the tip exposed. You can pull it out and use it again once the glue dries. This provides just enough holding power to keep the part from floats as the glue expands.
In the Next Episode
Next time, we’ll look at building some of the decorative elements. This will include the bump out and how I built some of the features. This won’t include the fancier bits (like the control panel or the arc reactors). Maybe I’ll even throw the door stickers into the next post!


Recent Comments